Glass etching is something that I have seen all over the blog world here lately. Especially since the Silhouette came out to make it so much easier. I found out just how easy it is when I did my first glass etching recently. My mother had come to me and originally asked if I could put vinyl on some glass candy containers for her to give to 3 of her neighbors. I then told her about the glass etching I had been reading about online and that this would be a great time to try it out. That's how all this got started. Here is how I did it (my pictures jump around a bit since there were 3 different jars with 2 etchings on each)....
The first step was to get my design together in the Silhouette software. I chose to put the family name on one side and a snowflake on the opposite side.
Next, I cut the design out of vinyl using my Silhouette.
This is the glass jar that I would be etching. I made sure that it was clean on the sides that I would be etching.
After the vinyl is all cut out, then remove all the vinyl pieces that make up the letters and a stencil is created. The white part you see will be the stencil. I then put a piece of transfer paper on the top of each stencil. This is to keep all of the little "island' pieces in place when the stencil is applied to the glass.
Peel the backing paper off of the vinyl and then apply it to the glass container. Give it a good rub to make sure it's all stuck down.
Carefully remove the transfer paper. Be careful that all the small pieces are staying stuck to the glass.
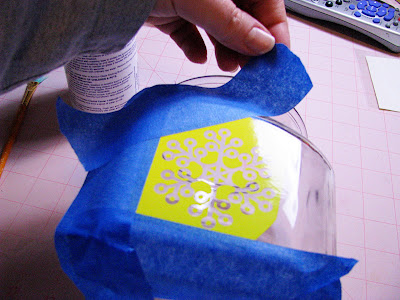
I then applied painters tape (masking tape will work too) around the entire stencil to just give the unetched glass a little bit more protection. I want the etching creme to go only where I want it to be.
Then take the etching creme and apply it on top of your stencil to all the exposed parts. I applied it pretty heavily so that I couldn't see through the stencil at all.
After the entire stencil is covered in the etching creme (I used the Armor brand by the way), set a timer for 5 minutes. Yep...only takes 5 minutes to etch glass!
I didn't get pictures of the next few steps, but once your timer goes off, scoop up all the etching creme that is piled up on top of your stencil and put it back in the container to use again. The little bottle is $20, so it's nice to know that you can reuse it! Once you have all the excess off of the stencil, take your glass container to your kitchen sink and rinse the rest off. Peel your stencil off the glass carefully and then wash the etched surface with soap and water. You can then clean it with glass cleaner too if you want.
Here is a closeup of one of the finished jars!
Here is all 3 of the jars!
This was a fun and really easy project. If you don't have a Silhouette, you can also use clear contact paper and cut out your own stencil with your Xacto knife. I can totally see myself making lots of wedding, birthday, and Christmas gifts that involve etching glass What a special personalized wedding gift it would be for a couple and so inexpensive! Or you could add a name to a casserole dish, so that you will always find your dish when you go to a potluck dinner.
Merry Christmas!
Alicia


That is so pretty!! I have wanted to try that but haven't had time to get instructions, thank you for the tutorial!
ReplyDelete