Sunday, December 18, 2011

Glass Etching

Glass etching is something that I have seen all over the blog world here lately.  Especially since the Silhouette came out to make it so much easier.  I found out just how easy it is when I did my first glass etching recently.  My mother had come to me and originally asked if I could put vinyl on some glass candy containers for her to give to 3 of her neighbors.  I then told her about the glass etching I had been reading about online and that this would be a great time to try it out.  That's how all this got started.  Here is how I did it (my pictures jump around a bit since there were 3 different jars with 2 etchings on each)....

 
The first step was to get my design together in the Silhouette software.  I chose to put the family name on one side and a snowflake on the opposite side.

Next, I cut the design out of vinyl using my Silhouette.

This is the glass jar that I would be etching.  I made sure that it was clean on the sides that I would be etching.

After the vinyl is all cut out, then remove all the vinyl pieces that make up the letters and a stencil is created.  The white part you see will be the stencil.  I then put a piece of transfer paper on the top of each stencil.  This is to keep all of the little "island' pieces in place when the stencil is applied to the glass.

Peel the backing paper off of the vinyl and then apply it to the glass container.  Give it a good rub to make sure it's all stuck down.

Carefully remove the transfer paper. Be careful that all the small pieces are staying stuck to the glass.

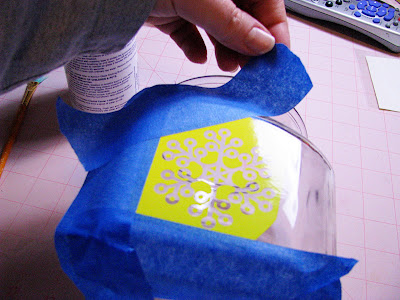
I then applied painters tape (masking tape will work too) around the entire stencil to just give the unetched glass a little bit more protection.  I want the etching creme to go only where I want it to be.

Then take the etching creme and apply it on top of your stencil to all the exposed parts. I applied it pretty heavily so that I couldn't see through the stencil at all.

After the entire stencil is covered in the etching creme (I used the Armor brand by the way), set a timer for 5 minutes.  Yep...only takes 5 minutes to etch glass!


I didn't get pictures of the next few steps, but once your timer goes off, scoop up all the etching creme that is piled up on top of your stencil and put it back in the container to use again.  The little bottle is $20, so it's nice to know that you can reuse it!  Once you have all the excess off of the stencil, take your glass container to your kitchen sink and rinse the rest off.  Peel your stencil off the glass carefully and then wash the etched surface with soap and water.  You can then clean it with glass cleaner too if you want.

Here is a closeup of one of the finished jars!

Here is all 3 of the jars!

 
This was a fun and really easy project.  If you don't have a Silhouette, you can also use clear contact paper and cut out your own stencil with your Xacto knife. I can totally see myself making lots of wedding, birthday, and Christmas gifts that involve etching glass  What a special personalized wedding gift it would be for a couple and so inexpensive!  Or you could add a name to a casserole dish, so that you will always find your dish when you go to a potluck dinner.

Merry Christmas!

Alicia      

Monday, December 12, 2011

Christmas Candlestick Makeover!


Of all the holidays, I have to say that Christmas is my favorite. I love the warm fuzzy feeling of the lights on the tree, the time spent with family, and of course all the yummy food the holiday brings.

As a kid I loved to help my Mom decorate our house, and that hasn't changed til this day. I saw a neat idea for decorating with candlesticks in a Better Homes & Gardens magazine not too long ago, and liked it so much I set out on an adventure to make my own version.

First, I took a trip to the Goodwill store to find candlesticks the sizes that I wanted. I was looking for varying heights and similar shapes. With 15 minutes left before the store closed, I managed to pick out three perfect candlesticks for my project for only six bucks!


Two of these babies are brass, and the other is some sort of resin material. Color didn't matter to me since they are getting a coat of spray paint in a nice soft white color. First, I had to prime them so the paint would cover nicely. I used a white primer since I picked a nice soft white for my candlestick color. Always chose a primer close to the color you are painting the object. It will save you additional work in the end.


Hobby Lobby had Krylon paint on sale for 30% off. I was very pleased with how this particular primer covered these candlesticks. Very smooth and even.


I used two coats of primer, and two coats of Krylon Dover White in gloss for the finishing color. After letting the paint dry an hour after each coat the candlesticks were ready for decoration. Did I mention that I love Krylon? That paint sticks to anything!


I added three ornaments from our ornament stash to the top of each candlestick and a ribbon on the tallest one for that added touch, along with a poinsettia flower I had on hand. I set them up on a small table in the living room and was very pleased with how they turned out. What are you decorating with this Christmas? Drop us a note, we'd love to hear from you!

Sunday, November 20, 2011

Scrapbooking on a budget

I've recently started digital scrapbooking and now I wonder why I did not start years ago!!  

While I still love regular scrapbooking, I love the flexibility and low cost of the digital scrapbooking.  I also love being able to share my work through email or Facebook.  I've made a few pages and even the banner to this website using the software.  
The largest expense for digital scrapbooking is the actual cost of the software itself.  Once you have the software, you can find loads of free or cheap papers and elements to add to your collection.  I have thousands of items and have spent less than $10 of my own money. 

Stay tuned in the next few days as I share more details on my new hobby, and give all of you a chance to win a copy of the digital scrapbooking software I use! 


The pages below are from a recent visit to the Jack Daniels Distillery by our very own Shawna (poster of the fall bouquet and fall cupcakes last week) and me.  Enjoy! 


Friday, November 11, 2011

Pretty Pretty Fall Cupcakes!


Fall has arrived, with its gorgeous colors and crisp cool air, this is the perfect time for a bonfire. The hubby has soup cooking in the Crockpot, and I set about to baking. I wanted to make these from scratch but time did not permit that, so I used some good old Duncan Hines cake mix with some Betty Crocker frosting. Sometimes you just can’t go wrong with convenience.

Here’s what I used:


I had two cupcake pans handy too so that saved me some baking time, seeing as how a box of mix makes 24 cupcakes. I used the Betty Crocker whipped cream cheese icing which was FABULOUS as far as spreading over the cupcakes when they were cooled.

To begin, preheat the oven to 350 degrees. Gather your pans, mixes, and ingredients as listed on the box of cake mix. I used my vintage Tupperware mixing bowl with the little spout so I can pour the mix into the papers. I have used this since I was a little girl. (Thanks Mom, this little guy is still going strong!)


Mix the ingredients together as directed then place the cupcake papers in the pan.


Now you can start pouring the batter!


After all the batter is poured, stick these babies in the oven for about 20 minutes.


I wanted to make my cupcakes to be slightly customized, so I emptied the frosting into a bowl and used food coloring (yellow and red) to color the frosting orange. This frosting was excellent to work with.


I was very pleased at the color of orange the colors made, you can’t really tell in the picture below, but it’s really pretty. Promise.


In addition to colored frosting, I used cute little papers with toothpick leaves and pumpkins to top them. (That way it LOOKS like they could have been made from scratch…he he hee!!)


By the time you finish mixing the colors to the desired shade, the cupcakes will be ready to come out of the oven. Oohhh look!


Let them cool for another 15-20 minutes, then apply the frosting. Top off with a cutie patootie toothpick, arrange on a cute plate, and Ta daaa! Pretty Pretty Fall Cupcakes!!

Wednesday, November 9, 2011

You cleaned it with what?!?!


We moved in August and the master bathroom has a shower stall with a glass (I'm sure it's really plexiglass) surround. Now, I love the natural lighting and openness but I HATE the soap scum.

I've tried spray after spray after spray and nothing seemed to make a difference. Then one day, I saw a tip online that said to use dryer sheets.

I'll give you a moment to let that sink in.
.
.
.
Yes, I really said dryer sheets. 

Stop smirking! I did that too, ya know. I thought, "Ha! Whatever! Dryer sheets will not do anything to soap scum." Boy, was I wrong!

I grabbed a dryer sheet today, ran it under cold water to dampen it and started rubbing. I could immediately feel the grittiness on the door breaking down and disappearing. After wiping down the entire door and rinsing it with water, I was left with a door I could SEE through, when I had not been able to see through it a few minutes before.

I think after a few more dryer sheet treatments, I might just have the shower stall looking like new again!


Tuesday, November 8, 2011

Fall Floral Arrangement

Welcome to our Blog! I'm Shawna, and I finally made something this week. Woo hoo!

I am a collector of stuffs. I prefer vintage stuffs and try to re-purpose or use it for its original intent whenever possible. I find great joy in reviving items of old in today’s modern times. Luckily my friends and family feed that fire and take me to cool places that sell old stuff. This particular item caught my fancy at The Old Feed Store in Woodbury, TN where my Mamaw and I were shopping. (I get my love of collecting from Mamaw. I heart her!). This pitcher is a Jewel Homemakers brand tea pitcher with a missing lid. Oh darn, no lid. Guess who doesn’t drink tea? Yeah so I don’t care about the lid, plus that made it cheaper to purchase (under $20). I do however love to fill vases, pitchers and random whatnots with flowers.

Jewel Tea Pitcher

So, I ran to the good old Dollar Tree and found some neat fall foliage to stuff in my awesome tea pitcher.


It just so happens that the Dollar Tree also has floral foam too, so I grabbed some random shapes since I wasn’t sure what size would be best. You could measure your pitcher before buying floral foam, but where’s the fun in knowing exactly what you need for a project?


So, with foam in hand, I determine which shape to use. I had my heart set on the square. *sigh* So I used the smaller shape that actually fits perfectly in the pitcher. I ended up using two of these guys since the pitcher was quite tall. I could have shaved the corners off the square one and used it, but it was easier to just stack two small ones on top of each other.

Too short....

Now the fun starts, determine how you want your arrangement to look. I had an idea in mind from surfing the Michael’s website and viewing all the fall do-it-yourself arrangements. (Oh, and don’t forget you’ll need some floral cutters or heavy duty cutting pliers). Since I am not a professional, I Googled flower arrangements for help, and placed my focal flowers first, along with some sprays of grass. I placed the secondary flowers to fill in the voids. Then, I got so wrapped up in placing the flowers in the pitcher that I totally forgot to take progression photos….soooo….here’s the finished product!


I was pretty proud of this considering it’s my first floral arrangement ever. I did learn that it would probably look better with higher quality flowers, so the next floral sale at Hobby Lobby will be my next stop for the Christmas arrangement I will do. So with that in mind, go find a neat item from a yard sale, flea market, etc. and grab some flowers of your choice to fill it with!

Monday, November 7, 2011

Spicy!

For most of 2008 and 2009, I was unemployed.  That left me lots of time to do some cheap crafting.  Now, cheap crafting is great, but sometimes....great ideas end up not turning out so great afterall.  This is one of those times. 

When I got married in 2005, I was given a rotating spike rack.  I use it almost daily and do love it, but I have never used a lot of the spices that came in it.  It became apparent that a makeover was in order.  I threw out all the spices I had never used and probably never would use.  I then replaced them with the spices from the cabinet that could now be put in the rotating rack.  All my Penzey's Spices needed a home in my spice rack too!  This project was before I had my Silhouette....before I ever dreamed of having one.  My grand idea was to print out the spice names onto regular white sticky labels.  This was good in theory, but they started falling off pretty quickly.  Not sure if it was the surface or probably the heat coming from the stove/oven.  In fact, one of the jars in the picture has fallen victim.

Once, I did have my Silhouette, this was one of my first big projects to test it out.  I was sick and tired of always having to glue the labels back on all the time and they were getting dirty since they were just paper labels.  So, after I had gotten some nice red vinyl, I got on my Silhouette computer software and designed myself some new labels.


After cutting everything out and then cutting each individual label out, I was ready to apply them to the jars.  I don't have a picture of the process, but it took FOREVER.  ha ha!  After peeling the transfer paper off each label (leaving all the letters still intact), I applied each label to the lids.  I then took my craft tweezers and craft needle and carefully peeled up all of the letters (one itty bitty letter at a time) so that it revealed the black of the lids.

Here is the finished spice rack.  I LOVE how it turned out since it really "pops" in my kitchen now.


I am also a paper cardmaker and a digital invitation & announcement designer.  I hope to be posting some of those creations every soon!  Thanks for visiting!

Sunday, November 6, 2011

Silhouette fun!

Hi everyone!  I'm Alicia and this is my very first post on our brand new blog!  I'm excited about having a place to post all of my projects.  This first project I am sharing is one that I completed a couple of months ago, but never did anything with the pictures that I took.  I have a pretty neglected personal family blog.  ha ha!  Anyways, I got a Silhouette earlier this year and I have been trying to find ways to put it to use and do that inexpensively.  I attending a painting event at my church earlier in the Summer and I was given a leftover blank canvas from it.  I am a Pinterest junkie and had seen this project on there and I knew that I could duplicate it.  I think the original probably came from one of those expensive catalogs.  Here we go...

The first step is to paint the entire canvas with a good couple of coats of acrylic paint.  I also painted the sides of my canvas, but didn't take a picture of it at that state. 

The 2nd step was to get in my Silhouette computer software and design the wording that I needed to cut out of vinyl.


Next, I chose a piece of vinyl and cut out the first word I was going to be using as a stencil.
Your eyes are not deceiving you....the vinyl color did change.  I screwed up the first one when I was removing the backing paper and had to cut it out again.  Once I had my vinyl stencil cut out and had removed all the letters and all I had left was my word stencil, I removed the backing paper and positioned it where I wanted it on my completely dry canvas.

I next applied a couple of coats of bright white acrylic paint and allowed it to set up.....didn't let it totally dry.

I carefully peeled back the stencil while the paint was just set up enough to not really be wet.  I then applied the other two stencils and painted them.  I could have just applied them all at the same time, but for some reason I didn't.....I make odd decisions when I craft.  ha ha!

Peel off your remaining stencils and call it done.  Now, it's a little bit crooked, but the perfectionist in me is trying really hard not to notice it. ha ha! 

I really hope that you'll see some great projects on here from us gals that will inspire you to look at the resourses around you and figure out how you can get your crafty on too!

Friday, November 4, 2011

Once upon a time . . .

My mother-in-law means well.  She really does.  She just doesn't know our taste.  And our taste does not include Cinderella and cute kitties. 

The last time we went for a visit, we were given a clock.


A clock featuring Cinderella. 


Cinderella with a pumpkin coach.  And fairy godmothers.  And it plays music on the hour. 

This is probably a good time to mention the youngest person in our household is 18.  *shakes head*  I tried to sell the clock on Craigslist, but no one from there wanted it either.  So I had no choice.  I had to make it into something that suited our style.  

First step - disassembly. 


Second step - creating a new background out of foam core. 


Third step - create something new.  Mod podge, scrapbooking paper, and a little bit of time, and I came up with a new design that is more along the lines of what we might purchase for ourselves.


The finished product isn't perfect (cutting ovals from foamcore in an exact size is quite difficult without the right tools), but I like it.  Now, I can get rid of the plain, plastic $5 clock that is hanging in our living room and replace it with this!!